


English
Views: 0 Author: Site Editor Publish Time: 2026-06-22 Origin: Site


While Polystyrene (PS) wall panels offer a highly accessible way to upgrade interiors, standardizing on the wrong specification causes headaches. Bad choices lead to premature wear, obvious seaming, or aesthetic mismatches. The decision-stage challenge is no longer whether to use these modern materials. You must figure out how to filter through varying densities, finishes, and dimensional tolerances. Finding the exact match for your project's technical and visual requirements requires careful evaluation. Many buyers focus entirely on the surface look. They completely overlook the structural core beneath it.
This guide provides an evidence-based framework for evaluating, shortlisting, and selecting a panel. You will learn how to analyze core density and manage sizing dimensions effectively. We balance durability, installation efficiency, and architectural integrity. By the end, you can confidently navigate supplier specifications and secure a lasting interior finish.
Validate Material Density: Not all PS is equal; evaluating the core density is critical for impact resistance and longevity.
Calculate Sizing Accurately: Choosing the right panel length minimizes horizontal seams and reduces material wastage.
Request Physical Samples: Always conduct structural tests (bend, scratch, and water tests) before committing to a bulk order.
You must map out your project environment before reviewing material catalogs. The installation zone dictates the required durability level. We categorize spaces into high-traffic and low-traffic areas. Hallways, commercial lobbies, and public corridors see constant movement. These zones require high impact resistance to survive accidental bumps from luggage or carts. Bedroom accent walls and formal dining rooms experience far less physical contact. In these low-traffic zones, aesthetic flexibility takes priority over extreme structural toughness.
Moisture and temperature variables also play a significant role in material selection. You must define the baseline humidity of the space. These environments require strict waterproofing standards. Polystyrene inherently resists water. However, prolonged exposure to steam requires a highly stable core. You must also account for thermal expansion. Rooms facing direct sunlight will heat up quickly. Panels installed here need adequate room to expand and contract.
Establishing realistic lifecycle expectations helps frame your material investment. You should determine how long the installation must last before requiring maintenance. Commercial spaces usually demand a ten-year flawless lifespan. Residential accent walls might update every five years. Understanding this timeline helps you evaluate premium versus economy options. A premium PS Wall Panel resists fading and denting much better than entry-level alternatives. You avoid premature replacement by matching the material grade to your lifecycle needs.
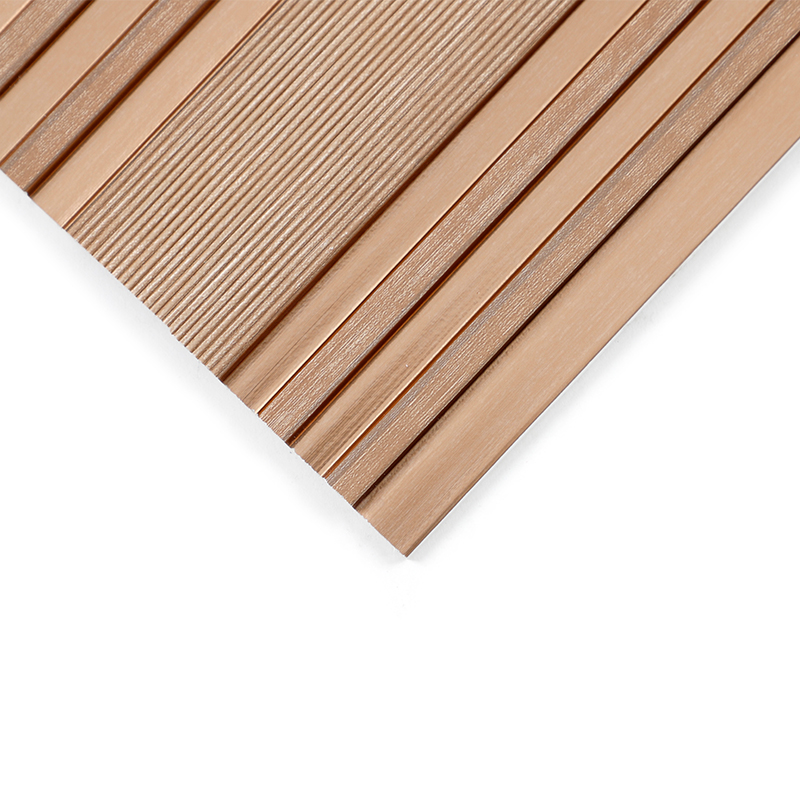
Different surface profiles solve distinct architectural problems. You can use visual textures to manipulate how a room feels. Vertical fluting creates a powerful illusion of height. It draws the eye upward, making low ceilings feel more spacious. Deep 3D profiles offer mild acoustic dampening properties. They break up sound waves to reduce room echo. Flat profiles deliver a sleek, minimalist aesthetic. They work perfectly for modern, understated environments.
| Profile Type | Visual Effect | Best Application Scenarios | Maintenance Difficulty |
|---|---|---|---|
| Fluted (Slat) | Adds vertical height and linear rhythm. | Living room feature walls, office lobbies, headboards. | Medium (requires dusting between slats). |
| Flat / Seamless | Creates smooth, monolithic surfaces. | contemporary dining rooms, minimalist spaces. | Low (easy to wipe clean in one motion). |
| Deep 3D | Provides shadow play and acoustic diffusion. | Home theaters, large open-plan rooms, dramatic accent walls. | High (dust can settle on protruding geometric edges). |
Finish and veneer quality determine how realistic the final product looks. Manufacturers use different lamination processes to create the surface layer. Printed films offer basic color variations but often lack depth. Hot-stamped foils transfer realistic wood grains and metallic sheens directly onto the panel. Extruded colors mix pigments directly into the polystyrene core. You should always check the UV resistance of the finish. High-quality laminates include protective layers to prevent yellowing under natural sunlight. They also resist peeling in humid environments.
You must balance modern texture trends against long-term visual appeal. Highly specific geometric patterns might look trendy today but feel dated quickly. Wood grains and subtle matte finishes remain timeless. When you select a Decorative PS Wall Panel, ensure it aligns with your broader interior design language. The chosen texture should complement your flooring and furniture rather than competing for attention.
Standard market dimensions directly impact logistics and handling. Manufacturers usually produce panels in specific widths to optimize shipping. Common widths range from 120mm to 300mm for slatted designs. Standard lengths typically reach 2800mm or 2900mm. These lengths align perfectly with standard residential ceiling heights. Transporting panels over three meters requires specialized freight. You should consider elevator dimensions and stairwell turns before ordering oversized lengths. Handling extra-long panels often requires a two-person team to prevent snapping.
Panel thickness serves as a vital performance metric. Thickness directly correlates to rigidity and wall-flaw concealment. Thicker materials hide imperfect drywall effortlessly. Thinner materials highlight every bump underneath. You must evaluate your existing wall condition before selecting a thickness.
12mm to 15mm Thickness: These highly rigid panels bridge gaps over uneven masonry or textured drywall. They provide substantial impact resistance.
8mm to 10mm Thickness: These offer a balanced approach. They work well for standard painted drywall and moderate traffic areas.
5mm to 7mm Thickness: These lightweight options require a perfectly flat surface. You typically need Level 5 drywall finishes to prevent warping or telegraphing flaws.
You must formulate a clear logic for wastage and seam management. Selecting lengths that allow for floor-to-ceiling continuous runs represents a crucial best practice. This approach mitigates the need for horizontal joining seams. Horizontal seams catch the eye immediately and compromise the visual finish. If your wall height exceeds standard panel lengths, you should introduce an architectural break. Adding a chair rail or a horizontal metal trim hides the transition beautifully. Accurate initial measurements prevent excessive off-cut waste.
Core density serves as the ultimate indicator of structural longevity. High-density polystyrene prevents denting and crushing under everyday impact. You can evaluate this by checking the weight-to-volume ratio. Heavier panels generally contain more raw material and less trapped air. Low-density panels feel overly light and hollow. They compress easily when you press them hard. A dense core ensures the panel holds screws firmly and maintains its shape over decades.
You should physically test the structural integrity of your shortlisted materials. We call this the bend test. A quality panel should exhibit slight flexibility. This flex allows it to accommodate slightly uneven walls during installation. However, it should not snap, crease, or turn white at the stress point. Brittle panels crack easily during cutting and transport. Overly soft panels lack the rigidity needed for a straight, professional installation. The ideal panel strikes a balance between stiffness and minor adaptability.
Compliance and safety standards guarantee the material fits enclosed indoor environments safely. You should look for specific fire retardancy ratings. Class A or B fire ratings (under ASTM standards) indicate the material slows flame spread. Lower ratings pose a severe hazard in residential and commercial spaces. Additionally, you must verify VOC (Volatile Organic Compound) emission standards. High-quality products carry certifications showing low or zero toxic off-gassing. Indoor air quality remains paramount, especially in bedrooms and poorly ventilated hallways.
Adhesive and substrate compatibility present the most common installation hurdles. Using incorrect construction adhesives ruins the project immediately. Many standard construction glues contain harsh chemical solvents. These solvents chemically react with polystyrene, melting the core from the back. You must specify high-tack, solvent-free adhesives. Polyurethane-based or hybrid-polymer grabbing adhesives work best. They provide an immediate hold without damaging the plastic structure. You also need to clean the substrate thoroughly. Dust or grease on the wall prevents the adhesive from bonding securely.
You cannot ignore the physical reality of temperature-induced expansion. Polystyrene expands in warm weather and contracts in cold weather. Failing to account for this movement causes panels to buckle, pop off the wall, or warp over time. You must leave micro-gaps at the room perimeters. Leaving a 2mm to 3mm gap at the floor and ceiling allows for natural shifting. You can easily hide these functional expansion gaps behind baseboards and crown molding.
Cutting and routing friction generate high temperatures. The melting point of polystyrene requires careful tool management during installation. Using dull blades or improper saws melts the plastic edges instead of cutting them. This results in jagged, messy seams. You can achieve clean cuts by following a specific approach.
Select the Right Blade: Use a fine-tooth saw blade designed for plastics or non-ferrous metals (minimum 80 teeth).
Control the Speed: Run your miter saw or circular saw at a medium speed. Excessive speed creates friction burns.
Cut Face Up: Always place the decorative side facing the blade entry point to prevent the veneer from chipping.
Use Masking Tape: Apply blue painter's tape over the cut line before sawing. This prevents the lamination foil from tearing.
You should never buy wall cladding based purely on digital photographs. Monitors distort colors, and renders hide structural weaknesses. You must create a definitive checklist for testing physical samples in your actual space.
First, test scratch resistance using a common key or a coin. Apply moderate pressure across the veneer. Premium laminates resist minor scuffs, while cheap foils tear immediately. Second, conduct a water submersion test. Submerge a small off-cut in a bucket of water for 24 hours. Check the edges for any delamination or swelling. True high-grade polystyrene remains completely unaffected. Finally, inspect the sample under intended room lighting. Check the surface during the daytime and at night. Artificial warm lighting completely changes how a wood-grain veneer appears compared to natural daylight.
Supplier vetting protects your project timeline. Establish strict criteria for choosing a manufacturer or retailer. Evaluate their warranty terms clearly. A reputable supplier offers long-term guarantees against fading and indoor warping. You must also confirm batch-color consistency guarantees. Manufacturing runs can vary slightly in hue. If you need to order extra panels later, you want assurance they will match your original batch exactly. Furthermore, review their replacement policies for transit damage. Polystyrene edges can chip if freight handlers drop the boxes. The supplier must offer a frictionless replacement process for damaged goods.
Choosing the correct wall panel requires moving past superficial aesthetics. You must evaluate core density, dimensional suitability, and environmental constraints. Surface beauty means little if the core material cracks under mild impact or the adhesive melts the backing. A systematic approach to sample testing protects your interior investment.
To move forward successfully, keep these actionable next steps in mind:
Always order a minimum of three physical samples to perform scratch, bend, and water tests.
Map your room dimensions meticulously to select panel lengths that avoid horizontal seams entirely.
Purchase only solvent-free, high-grab adhesives specifically rated for plastics.
Verify fire safety and VOC certifications before introducing the material into enclosed living spaces.
A: Yes, you can install them over existing surfaces if the substrate is structurally sound. You must remove loose wallpaper to ensure the adhesive bonds to the actual wall. For tiles, thoroughly clean the surface to remove grease and use a premium high-tack polymer adhesive. Scuffing glossy tiles slightly improves the grip.
A: Maintenance requires only a soft microfiber cloth and warm water. You must avoid abrasive sponges, bleach, and chemical solvents, as these will strip the protective UV coating and ruin the veneer. For stubborn marks, use a highly diluted, mild dish soap solution and wipe the panel dry immediately.
A: Polystyrene (PS) is significantly lighter than Wood Plastic Composite (WPC), making ceiling and high-wall installations easier. While all three resist water, PVC and WPC possess heavier, denser structures suited for exterior or extreme-impact zones. PS provides the most cost-effective, easily workable solution for premium interior decorative applications.


